The Bowmar Builders are an FLL team associated with Bowmar Elementary School. The purpose of this blog is to help other students interested in robotics to learn from what we have learned. As an FLL Robotics team we use the Lego EV3 robotics system and the Mindstorms graphical programming language.

Sunday, October 17, 2021

Using Rack and Pinion for Steering a Robot

 Using Rack and Pinion Gears for Steering a Robot

By Julia Byrd
October 17th, 2021


After my last experiment in using rack and pinion gears, I was googling and noticed a picture of a rack and pinion gear for a car. So I wanted to use one to steer some wheels.

I used the blue wheels and the large rack gear. It took some trial and error to figure out how to connect the rack to the wheel.


Connecting both wheels, I noticed that it would wiggle a lot and I needed a) something to push against, and b) hold the rack up in place.


I added a regular beam to the other side. I should be able to use the blue regular beam to connect the wheels to the robot frame. By holding one part of the steering mechanism in place I can use that to push against and hold the pinion gear.


I'm also experimenting with which way the rack gear works better - rack up, pointing out or rack down, pointing in. This picture shows rack up, pointing out. Now I need to create a frame that holds the wheels, rack and pinion, and a motor.

This setup seemed to work okay. I reused my motor turning code to check it.


It worked. I did notice that because the way the rack is attached to the wheels that it moves back and forth as it turns.


I also noticed the hub doesn't fit too well on top. There is also a lot of space. Time for a re-do.


This looks like it will work okay. The wheels tilt side to side by two holes. The L piece helps push the rack against the pinion. The challenge now is mounting it onto a frame. And figuring out how to make it drive.


Rack and Pinion Gears

Rack and Pinion Gears

By Julia Byrd
October 17, 2021

Today I learned about rack and pinion gears. Rack and pinion gears change a spinning motion into a sliding motion. I also learned about using the light sensor to trigger the motion.

First, I wanted to set up the rack and pinion gears. I saw these in the kit and I wanted to learn how to use them.


Using trial and error I worked out how to hold these together but let them slide back and forth.


Next I wanted to connect it to a motor, so I made a frame for the motor.


Next I wanted to hold them all together so I mounted them on a big yellow plate.


With the motor set up, I tried some code to make the little gear (pinion) turn and move the flat gear (rack).

This worked really well. It took a few tries to figure out that 1.55 turned was the right amount. Next, I wanted it to turn both ways. So I thought I would try using a color sensor to let me choose which way it turns based on the color.


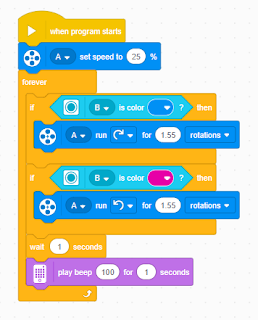
Then I worked up new new code that uses if blocks to choose direction based on color.


This also worked well. I noticed, however, that it would only do it once, and only if I had the color block in front of the sensor when I started the program. So I decided that adding a loop would be helpful. I also added a little wait and a beep in each loop so that I would know what was happening.


This worked just like I wanted. Two things I noticed about this code. First, the beep 100 scared my mom and sounded like the fire alarm! Second, if I held the same color block for too long then it would try to rotate again, but since it was at the end of the rack bad things would happen! In the future, I also would like to make it so that it starts after a certain color is shown.