By Stella E.

Friday, December 9, 2016
Coopertition
Integration
By: Lauren K.
To our team integration mean that we apply skills from robotics into everyday life. For example, Stella works in the library. A few days ago there was a girl who was sad and she helped her to be happy. I learned that it is important to respect others and be nice to them, so I have worked hard at being nicer and more respectful to my brother.
Discovery
By Stella E.
Discovery
To me discovery is beginning with the end in mind by focusing and understanding the big rocks to create a plan. Our team used this core value a lot at the beginning of the season. We discovered that communication and leadership are important.
Puppy Training Boot Camp Project
By Jonathan E. and Donovan B.

For blind people, seeing eye dogs are their eyes
to help them do tasks that the rest of us take for granted. Picking up
something that fell on the floor. Avoiding a car about to cross the crosswalk.
Not running into aisles and displays in the store. Finding a seat in a
restaurant. Finding the door just to walk into a store. Seeing eye dogs are
truly a companion in a world of darkness. There are many, many blind people who
want and need seeing eye dogs, including those in our community, but cannot get
one because there are not enough seeing eye dogs raised each year.
Students from the Bowmar Robotics team worked to
help with this problem. They organized a “Puppy Training Boot Camp” to help
inform our community about Gallant Hearts, a local non-profit seeing-eye dog
training organization. Gallant Hearts raises seeing-eye dogs for the blind, and
they provide them free of charge. However, it takes a lot of money to raise and
train a seeing-eye dog.
There are two effective ways our community can
help. First, sign up for a corporate donation program such as AmazonSmile and
Kroger Community Rewards. These programs do not cost us, the customer,
anything, but they are a great source of funds. Second, be a puppy training
family. Seeing-eye dogs start out life as puppies in training. Gallant Hearts
will pay for their food and veterinarian care. All you need to do as a family
is to love and care for the puppy and help socialize them so they get used to
going to lots of different environments. After 18 months you have to give up
the puppy so that the puppy can be trained and become a seeing-eye dog for a
blind person in need.
The Puppy Training Boot Camp was held at
PetSense last Saturday. We want to thank Rhonda Henley at PetSense, Becky Floyd
of Gallant Hearts, May (Becky’s guide dog), and Lindsey Jordan of Vicksburg Dog
Obedience Classes, and all the people who helped to put it on, as well as all
of the people who signed up for the community rewards programs.
If you would like to donate, the links for the
corporate donation programs are: http://smile.amazon.com/ and https://www.kroger.com/account/enrollCommunityRewardsNow. You can also donate directly to Gallant Hearts by visiting http://gallanthearts.org/contact-gallant-hearts/. Your support will truly help someone in need.
Gallant Hearts is a non-profit charity that has
helped countless blind people have a companion who helps them have a new window
into the world we take for granted. Helping Gallant Hearts will help numerous
blind people feel and be more able. Please donate today and consider being a
puppy training family!

Game Day Checklist
By Aaron B.
Here is my checklist for things to bring to the competition:
Here is my checklist for things to bring to the competition:
- Robot (charge it the night before!)
- Robot charging cord, USB cord
- Attachments
- Cart, if using one
- Core Values Board and any materials
- Project Presentation Materials
- Robot Design Materials
- Buttons or other give-aways
- Buttons or give-aways for judges
- Costume needs
- Extension cords, surge protectors (sometimes the venue has power available, sometime not.)
- Lego building sets (can keep in car if you are feeling confident)
- Drinks/snacks (they'll buy all the sugary stuff, so bring something non-sugary)
- Lunch $
- Camp chairs (at least for adults!)
- Laptop w/ power cord (for last minute tweaking of programs)
- Spare AA batteries w/ battery cover for EV3 (in case something goes really wrong with your battery, which has happened to us before.)
- Team paperwork
- Check for competition fee
- Tote to store jackets, etc., under table
- Signage/decoration for table
- Frisbee/football/etc. to play with at lunch time. Keep in car until lunch.
Thursday, December 1, 2016

Donate to Gallant Hearts
By Jonathan E.
Donate to Gallant Hearts by clicking on this link: Gallant Hearts
You can also donate to Gallant Hearts by signing up to Amazon Smile or Kroger Community. Every time you buy something a small piece of your payment goes to Gallant Hearts AT NO EXTRA COST!!!!! That goes for both programs.
Go to Amazon Smile to sign up.
Go to Kroger Community Rewards to sign up.
You are doing a good thing by donating to Gallant Hearts. You are funding a program that helps disabled people be normal. It will make them so happy. The money helps raise dogs. The dogs then go on to help blind people be happy and normal.
When you sign up to either of the programs, be sure to donate to Gallant Hearts when prompted with a choice to ensure your money makes it to Gallant Hearts.
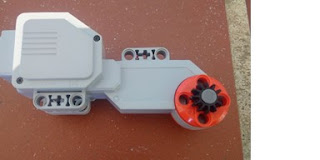
Pushing Mechanism
By Mateo B. and Stella E.
This mechanism can push easily if you add something to the front.
Get the parts: a large motor, 4 black friction pegs, a 15 hole connector, a large gear (black), a small gear (black), 2 red axle pegs, at least a size 6 axle piece, an axle piece with a stopper on it, 2 size 3 axles, 2 connector pieces (axle and hole pieces), a 2 hole piece and axle connector, a 2 axle connector and a 1 hole connector piece, a 5 hole connector, and 2 loose gray pegs.


Get these from your supplies: a small black gear and an axle piece with a stopper on it and a large motor.

Put here : as shown in the picture.
Get these from your supplies: a 15 hole connector and two black friction pegs.

Assemble them like this:

Get these from your supplies:

Assemble them like this:

Get these from your supplies: A large black gear, a size 3 axle, and a connector.

Assemble them like this:

Get these: A 5 hole connector, an axle-hole connector hybrid, and 2 loose pegs

Assemble them like this:

Put them together like this:

Get these:

Put these together:

Put them like this:

Put these together:

Put these on:

Get this: (can be longer)

Put it on like this:


Overview
This mechanism can push easily if you add something to the front.
Step 1
Get the parts: a large motor, 4 black friction pegs, a 15 hole connector, a large gear (black), a small gear (black), 2 red axle pegs, at least a size 6 axle piece, an axle piece with a stopper on it, 2 size 3 axles, 2 connector pieces (axle and hole pieces), a 2 hole piece and axle connector, a 2 axle connector and a 1 hole connector piece, a 5 hole connector, and 2 loose gray pegs.


Step 2
Get these from your supplies: a small black gear and an axle piece with a stopper on it and a large motor.

Step 3
Put here : as shown in the picture.

Step 4
Get these from your supplies: a 15 hole connector and two black friction pegs.

Step 5
Assemble them like this:

Step 6
Get these from your supplies:

Step 7
Assemble them like this:

Step 8
Get these from your supplies: A large black gear, a size 3 axle, and a connector.

Step 9
Assemble them like this:

Step 10
Get these: A 5 hole connector, an axle-hole connector hybrid, and 2 loose pegs

Step 11
Assemble them like this:

Step 12
Put them together like this:

Step 13
Get these:

Step 14
Put these together:

Step 15
Put them like this:

Step 16
Put these together:

Step 17
Put these on:

Step 18
Get this: (can be longer)

Step 19
Put it on like this:

FINAL PRODUCT:

Alternative Implementations

Problems with gripping, turning, and going over things
By Mateo B.
Today we discovered a problem with our robot. It was not turning very well at all. The wheels would keep slipping. So we tested it and found out that we needed to put more weight on the wheels. We changed our robot so that it was smaller and the center of gravity was just in front of the wheels.
We worked out the math that showed us what was wrong. The center of gravity was towards the front of the robot, which made the driving wheels have very little weight on them. Here is how you can figure this out for your robot.
The first thing to do is measure the distance between the wheels. We call this distance "L". Next, measure the distance from the back wheel to the center of gravity between the wheels. We call this distance "L_b". The ratio of these two numbers tells us a lot of information about how the robot will grip and roll over objects.

Once you have these two numbers you can use them in the fraction portion of the equation below.

As an example, say your "L" is 10 spaces and the center of gravity is roughly 2 spaces in front of the back wheels (L_b). The ratio for how much of the weight of the robot is on the back wheels is (1-2/10), or 0.8, which is 80%. The higher that percentage, the more grip your robot has. The problem with our last robot design was that we were at 30%. This left 70% on the front wheels, which made it very difficult to turn and to roll over things. We changed our robot design so that now it is at roughly 90% of the weight on the back wheels without an attachment, and 80% to 85% with an attachment on the front.
The equation shows us how there are four degrees of freedom for making the robot turn better. First, the "alpha" parameter is the coefficient of friction. (Coefficient means the number stuck on front of another number. It makes it smaller or bigger.) The coefficient of friction means how "sticky" or "slippery" the wheel is on the mat. The higher the coefficient of friction, the better. This number usually goes from 0 to 1 (for example, ice would be a small number, like 0.1. Concrete would be higher, like 0.8.) You can change the coefficient of friction by using tape on the wheels to get the dirt and dust off.
The second degree of freedom is the weight of the robot. Heavier = more sticky, but also more mass you have to move. So it pretty much equals out.
Third is the distance between the wheels, also called the wheel base. If you make the wheel base longer, without moving the center of gravity, then more weight is on the back. Shorter means less.
The last degree of freedom is where the center of gravity (also called center of mass) is located. Moving the center of gravity closer to the back wheels puts more of the weight on the back wheels, which is what you want.
If your drive wheels are on the front rather than the back, just flip the diagram around so that you are always measuring from your driving wheels.
For our robot we decided to both shorten the wheel base and move the center of gravity much further back. We moved the center of gravity by putting the heaviest part (the EV3 brick) just behind the wheels. This made the center of gravity just in front of the wheels. By making it shorter we made more it agile. The combination should let us go through the road walls and over the crossing barrier much more easily and with greater control.
Subscribe to:
Posts (Atom)